8a. Building an LDAP Test Plan
Section titled “8a. Building an LDAP Test Plan”In this section, you will learn how to create a basic Test Plan to test an LDAP server. You will create four users that send requests for four tests on the LDAP server. Also, you will tell the users to run their tests 4 times. So, the total number of requests is (4 users) x (4 requests) x (repeat 4 times) = 64 LDAP requests. To construct the Test Plan, you will use the following elements: Thread Group, LDAP Request, LDAP Request Defaults, and View Results in Table .
This example assumes that the LDAP Server is available at ldap.test.com.
8a.1 Adding Users
Section titled “8a.1 Adding Users”The first step you want to do with every JMeter Test Plan is to add a Thread Group element. The Thread Group tells JMeter the number of users you want to simulate, how often the users should send requests, and the how many requests they should send.
Go ahead and add the ThreadGroup element by first selecting the Test Plan, clicking your
right mouse button to get the Add menu, and then select
Add → ThreadGroup. You should now see the
Thread Group element under Test Plan. If you do not see the element, then “expand” the Test Plan tree by
clicking on the Test Plan element.
 Figure 8a.1. Thread Group and final test tree
8a.2 Adding Login Config Element
Section titled “8a.2 Adding Login Config Element”Begin by selecting the LDAP Users element. Click your right mouse
button to get the Add menu, and then select
Add → Config Element → Login Config Element.
Then, select this new element to view its Control Panel.
Like most JMeter elements, the Login Config Element’s Control Panel has a name
field that you can modify. In this example, leave this field with the default value.
 Figure 8a.2 Login Config Element for our Test Plan
8a.3 Adding LDAP Request Defaults
Section titled “8a.3 Adding LDAP Request Defaults”Begin by selecting the LDAP Users element. Click your right mouse button
to get the Add menu, and then select
Add → Config Element → LDAP Request Defaults. Then,
select this new element to view its Control Panel.
Like most JMeter elements, the LDAP Request Defaults Control Panel has a name
field that you can modify. In this example, leave this field with the default value.
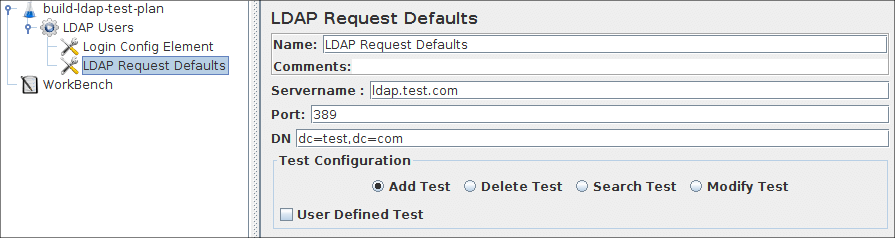 Figure 8a.3 LDAP Defaults for our Test Plan
8a.4 Adding LDAP Requests
Section titled “8a.4 Adding LDAP Requests”In our Test Plan, we need to make four LDAP requests.
-
Inbuilt Add Test
-
Inbuilt Search Test
-
Inbuilt Modify Test
-
Inbuilt Delete Test
JMeter sends requests in the order that you add them to the tree. Start by adding the first LDAP Request to the LDAP Users element (Add → Sampler → LDAP Request). Then, select the LDAP Request element in the tree and edit the following properties
-
Rename to “
Add” this element -
Select the
Add Testradio button inTest Configurationgroup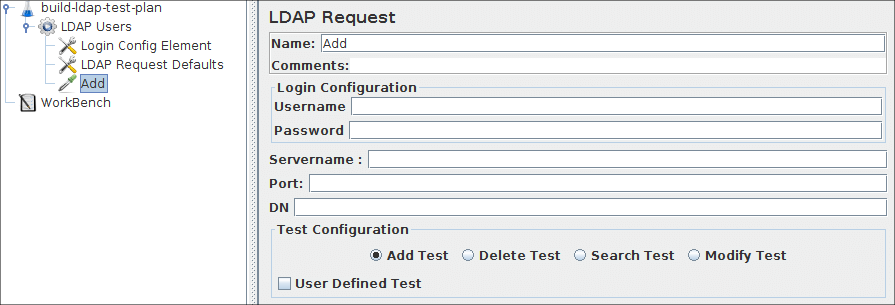 Figure 8a.4.1 LDAP Request for Inbuilt Add test
You do not have to set the
Servernamefield,portfield,Username,PasswordandDNbecause you already specified this value in theLogin Config ElementandLDAP Request Defaults.Next, add the second LDAP Request and edit the following properties
-
Rename to “
Search” this element -
Select the
Search Testradio button inTest ConfigurationgroupNext, add the Third LDAP Request and edit the following properties
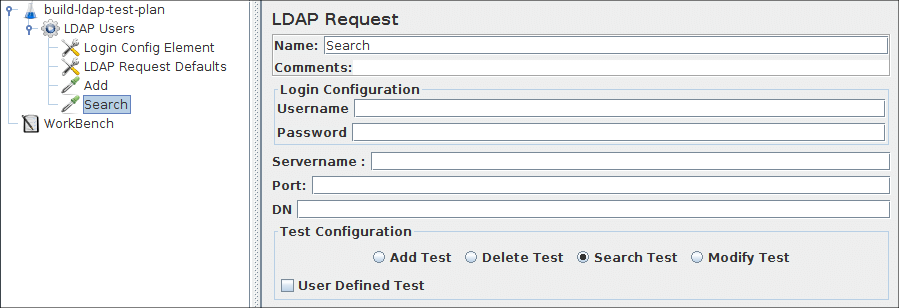 Figure 8a.4.2 LDAP Request for Inbuilt Search test
 -
Rename to “
Modify” this element -
Select the
Modify Testradio button inTest ConfigurationgroupNext, add the fourth LDAP Request and edit the following properties
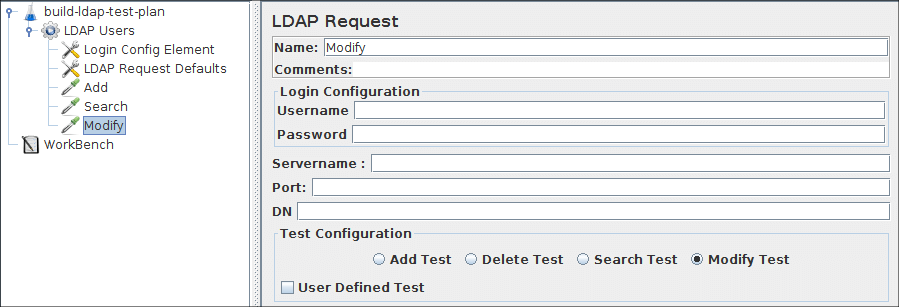 Figure 8a.4.3 LDAP Request for Inbuilt Modify test
 -
Rename to “
Delete” this element -
Select the
Delete Testradio button inTest Configurationgroup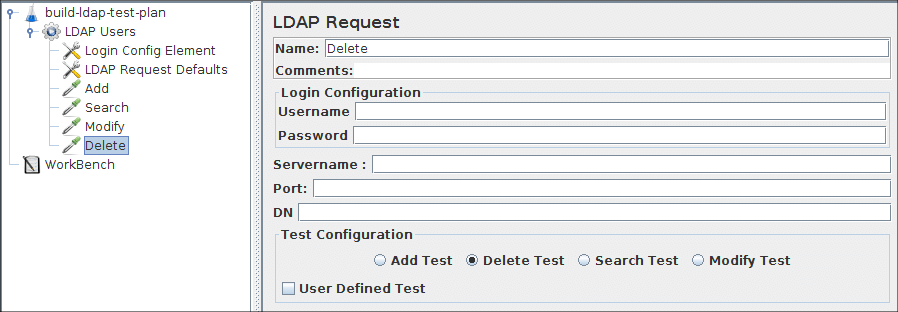 Figure 8a.4.4 LDAP Request for Inbuilt Delete test
8a.5 Adding a Response Assertion
Section titled “8a.5 Adding a Response Assertion”You can add a Response Assertion element.
This element will check the received response data by verifying if the response text is “successful”.
(Add → Assertion → Response Assertion).
- Select
Text ResponseRadio button inResponse Field to Testgroup - Select
SubstringRadio button inPattern Matching Rulesgroup - Click on
Addbutton and add the string “successful” inPattern to Testfield
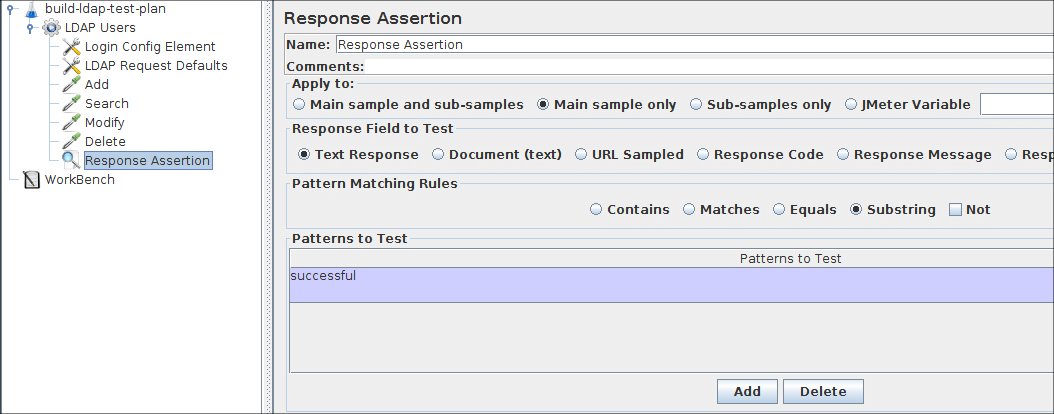 Figure 8a.5 LDAP Response Assertion
8a.6 Adding a Listener to View/Store the Test Results
Section titled “8a.6 Adding a Listener to View/Store the Test Results”The final element you need to add to your Test Plan is a Listener. This element is responsible for storing all of the results of your LDAP requests in a file and presenting a visual model of the data. Select the LDAP Users element and add a View Results in Table (Add → Listener → View Results in Table)
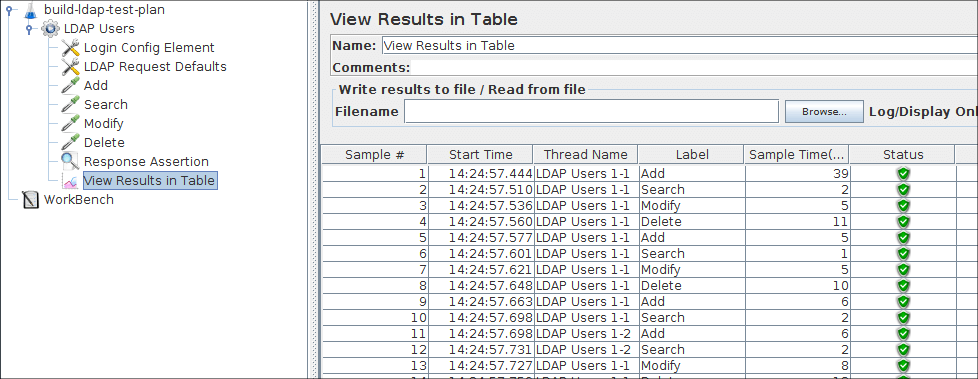 Figure 8a.6 View Results in Table Listener