Apache JMeter Distributed Testing Step-by-step
Apache JMeter Distributed Testing Step-by-step
25. Apache JMeter Distributed Testing Step-by-step
Section titled “25. Apache JMeter Distributed Testing Step-by-step”This short tutorial explains how to use multiple systems to perform stress testing. Before we start, there are a couple of things to check.
- the firewalls on the systems are turned off or correct ports are opened.
- all the clients are on the same subnet.
- the server is in the same subnet, if
192.x.x.xor10.x.x.xIP addresses are used. If the server doesn’t use192.xxor10.xxIP address, there shouldn’t be any problems. - Make sure JMeter can access the server.
- Make sure you use the same version of JMeter and Java on all the systems. Mixing versions will not work correctly.
- You have setup SSL for RMI or disabled it.
Once you’ve made sure the systems are ready, it’s time to setup remote testing. The tutorial assumes you already have JMeter installed on all the systems. The way JMeter works is one controller node initiates the test on multiple worker nodes.
 One controller node with multiple worker nodes
25.1 Terminology
Section titled “25.1 Terminology”Before we dive into the step-by-step instructions, it’s a good idea to define the terms and make sure the definition is clear.
Controller Node : the system running JMeter GUI, which controls the test
Worker Node
: the system running jmeter-server, which takes commands from
the GUI and send requests to the target system(s)
Target : the webserver we plan to stress test
 Categories of systems
25.2 Step-by-Step
Section titled “25.2 Step-by-Step”- On the worker nodes, go to
jmeter/bindirectory and executejmeter-server.bat(jmeter-serveron unix). - On controller node acting as the console, open windows explorer and go to
jmeter/bindirectory - Open
jmeter.propertiesin a text editor - Edit the line
remote_hosts=127.0.0.1 - Add the IP address. For example, if I have JMeter server running on
192.168.0.10, …,192.168.0.15, the entry would look like this:remote_hosts=192.168.0.10,192.168.0.11,192.168.0.12,192.168.0.13,192.168.0.14 - Start JMeter.
- Open the test plan you want to use
 Simple test plan
25.2 Starting the Test
Section titled “25.2 Starting the Test”At this point, you are ready to start load testing. If you want to double check
the worker nodes are working, open jmeter.log in your editor. You should see the following in the log.
Writing log file to: /XXXX/XXXXX/bin/jmeter-server.logCreated remote object: UnicastServerRef [liveRef: (local),objID:[-6a665beb:15a2c8b9419:-7fff, 3180474504933847586]]]If you do not see this message, it means jmeter-server did not start correctly. For tips on
debugging the issue, go to the tips section. There are two ways to
initiate the test: a single system and all systems.
25.3 Start a single clients
Section titled “25.3 Start a single clients”- Click Run at the top
- Select Remote Start
- Select the IP address
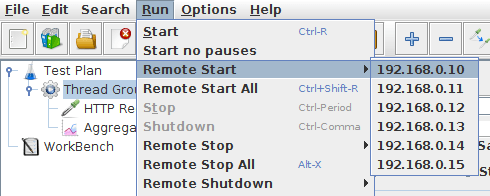 Start a single worker node
25.4 Start all clients
Section titled “25.4 Start all clients”- Click Run at the top
- Select Remote Start all or use
Ctrl + Shift + R
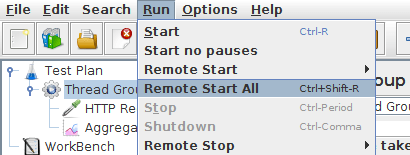 Start all worker nodes
25.5 Limitations
Section titled “25.5 Limitations”There are some basic limitations for distributed testing. Here’s the list of the known items in no specific order.
- RMI cannot communicate across subnets without a proxy; therefore neither can JMeter without a proxy.
- Since version 2.9, JMeter sends all the test results stripping Response data to the controlling console, this allows us to reduce impact on network IO. Ensure you monitor your network traffic so that this traffic does not incur contention
- A single JMeter client running on a 2-3 GHz CPU (recent CPU) can handle 1000-2000 threads depending on the type of test.
25.6 Additional resources
Section titled “25.6 Additional resources”Remote Testing in the user manual
25.7 Tips
Section titled “25.7 Tips”In some cases, the firewall may still be blocking RMI traffic.
Anti Virus and Firewall
Section titled “Anti Virus and Firewall”Firewall needs to be stopped from windows services or at least some ports need to be opened.
- Open control panel
- Open administrative tools
- Double click services
- Go to down to Symantec anti virus, right click and select stop
Windows firewall
Section titled “Windows firewall”- Open network connections
- Select the network connection
- Right click and select properties
- Select advanced tab
- Uncheck internet connection firewall
On Linux, iptables might be turned on by default. For instructions, please refer to the Remote Testing in the user manual
On RedHat (or derivatives), iptables is turned on by default. Execute
service iptables stopto stop the Linux firewall or ensure you open the correct ports.