

Configure the JMeter HTTP Authorization Manager configuration elements: properties, defaults, and practical usage notes for building reliable load tests.
Part of the Configuration Elements category. Also documented in context in the full Component Reference.
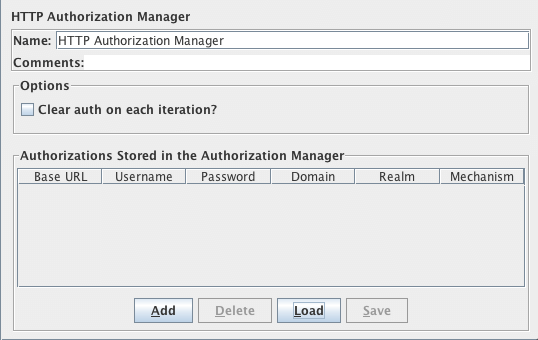
The Authorization Manager lets you specify one or more user logins for web pages that are restricted using server authentication. You see this type of authentication when you use your browser to access a restricted page, and your browser displays a login dialog box. JMeter transmits the login information when it encounters this type of page.
The Authorization headers may not be shown in the Tree View Listener “Request” tab.
The Java implementation does pre-emptive authentication, but it does not
return the Authorization header when JMeter fetches the headers.
The HttpComponents (HC 4.5.X) implementation defaults to pre-emptive since 3.2 and the header will be shown.
To disable this, set the values as below, in which case authentication will only be performed in response to a challenge.
In the file jmeter.properties set httpclient4.auth.preemptive=false
| Name | Required | Description |
|---|---|---|
| Name | No | Descriptive name for this element that is shown in the tree. |
| Clear auth on each iteration | Yes | Used by Kerberos authentication. If checked, authentication will be done on each iteration of Main Thread Group loop even if it has already been done in a previous one. This is usually useful if each main thread group iteration represents behaviour of one Virtual User. |
| Base URL | Yes | A partial or complete URL that matches one or more HTTP Request URLs. As an example, say you specify a Base URL of “http://localhost/restricted/” with a Username of “jmeter” and a Password of “jmeter”. If you send an HTTP request to the URL “http://localhost/restricted/ant/myPage.html”, the Authorization Manager sends the login information for the user named, “jmeter”. |
| Username | Yes | The username to authorize. |
| Password | Yes | The password for the user. (N.B. this is stored unencrypted in the test plan) |
| Domain | No | The domain to use for NTLM. |
| Realm | No | The realm to use for NTLM. |
| Mechanism | No | Type of authentication to perform. JMeter can perform different types of authentications based on used Http Samplers: Java : BASIC HttpClient 4 : BASIC, DIGEST and Kerberos |
Kerberos Configuration: To configure Kerberos you need to setup at least two JVM system properties:
-Djava.security.krb5.conf=krb5.conf-Djava.security.auth.login.config=jaas.conf
You can also configure those two properties in the file bin/system.properties.
Look at the two sample configuration files (krb5.conf and jaas.conf) located in the JMeter bin folder
for references to more documentation, and tweak them to match your Kerberos configuration.
Delegation of credentials is disabled by default for SPNEGO. If you want to enable it, you can do so by setting the property kerberos.spnego.delegate_cred to true.
When generating a SPN for Kerberos SPNEGO authentication IE and Firefox will omit the port number
from the URL. Chrome has an option (--enable-auth-negotiate-port) to include the port
number if it differs from the standard ones (80 and 443). That behavior
can be emulated by setting the following JMeter property as below.
In jmeter.properties or user.properties, set:
kerberos.spnego.strip_port=false
Controls:
AddButton - Add an entry to the authorization table.DeleteButton - Delete the currently selected table entry.LoadButton - Load a previously saved authorization table and add the entries to the existing authorization table entries.Save AsButton - Save the current authorization table to a file.
Authorization Example
Section titled “Authorization Example”Download this example. In this example, we created a Test Plan on a local server that sends three HTTP requests, two requiring a login and the
other is open to everyone. See figure 10 to see the makeup of our Test Plan. On our server, we have a restricted
directory named, “secret”, which contains two files, “index.html” and “index2.html”. We created a login id named, “kevin”,
which has a password of “spot”. So, in our Authorization Manager, we created an entry for the restricted directory and
a username and password (see figure 11). The two HTTP requests named “SecretPage1” and “SecretPage2” make requests
to “/secret/index.html” and “/secret/index2.html”. The other HTTP request, named “NoSecretPage” makes a request to
“/index.html”.
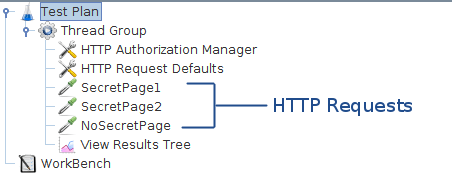 Figure 10 - Test Plan
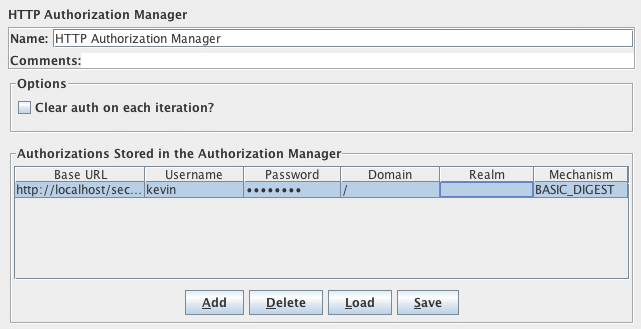 Figure 11 - Authorization Manager Control Panel
When we run the Test Plan, JMeter looks in the Authorization table for the URL it is requesting. If the Base URL matches the URL, then JMeter passes this information along with the request.