

Configure the JMeter HTTP(S) Test Script Recorder miscellaneous features: properties, defaults, and practical usage notes for building reliable load tests.
Part of the Miscellaneous Features category — formerly called HTTP Proxy Server. Also documented in context in the full Component Reference.
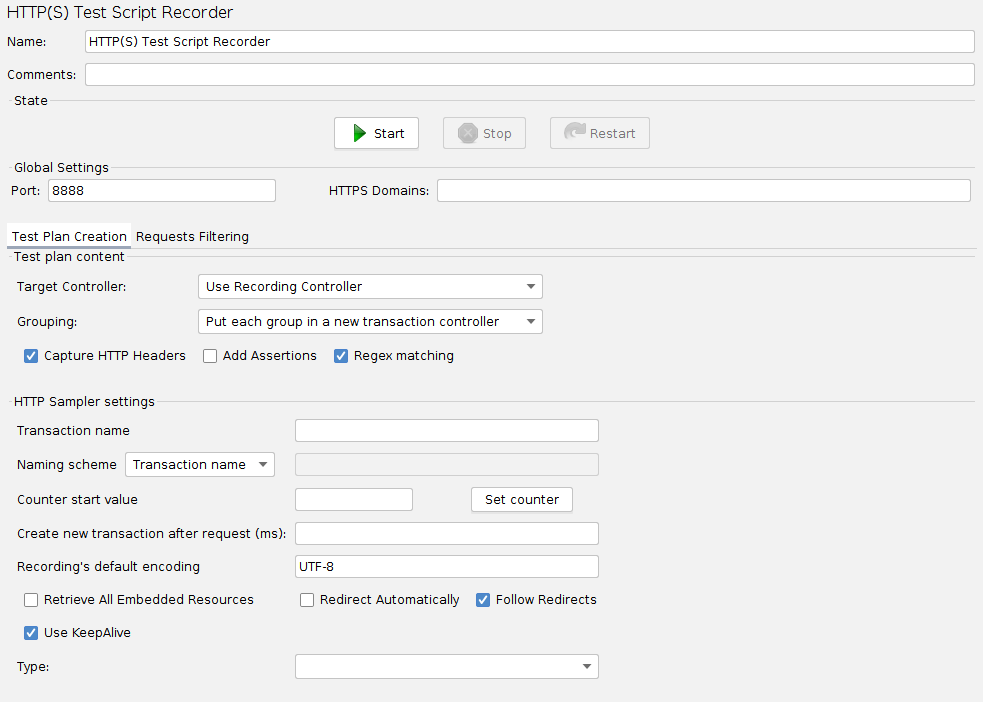
The HTTP(S) Test Script Recorder allows JMeter to intercept and record your actions while you browse your web application with your normal browser. JMeter will create test sample objects and store them directly into your test plan as you go (so you can view samples interactively while you make them).
Ensure you read this wiki page to setup correctly JMeter.
To use the recorder, add the HTTP(S) Test Script Recorder element. Right-click on the Test Plan element to get the Add menu: (Add → Non-Test Elements → HTTP(S) Test Script Recorder ).
The recorder is implemented as an HTTP(S) proxy server. You need to set up your browser use the proxy for all HTTP and HTTPS requests.
Ideally use private browsing mode when recording the session. This should ensure that the browser starts with no stored cookies, and prevents certain changes from being saved. For example, Firefox does not allow certificate overrides to be saved permanently.
HTTPS recording and certificates
Section titled “HTTPS recording and certificates”HTTPS connections use certificates to authenticate the connection between the browser and the web server. When connecting via HTTPS, the server presents the certificate to the browser. To authenticate the certificate, the browser checks that the server certificate is signed by a Certificate Authority (CA) that is linked to one of its in-built root CAs.
If any of the browser checks fail, it will prompt the user who can then decide whether to allow the connection to proceed.
JMeter needs to use its own certificate to enable it to intercept the HTTPS connection from the browser. Effectively JMeter has to pretend to be the target server.
JMeter will generate its own certificate(s).
These are generated with a validity period defined by the property proxy.cert.validity, default 7 days, and random passwords.
If JMeter detects that it is running under Java 8 or later, it will generate certificates for each target server as necessary (dynamic mode)
unless the following property is defined: proxy.cert.dynamic_keys=false.
When using dynamic mode, the certificate will be for the correct host name, and will be signed by a JMeter-generated CA certificate.
By default, this CA certificate won’t be trusted by the browser, however it can be installed as a trusted certificate.
Once this is done, the generated server certificates will be accepted by the browser.
This has the advantage that even embedded HTTPS resources can be intercepted, and there is no need to override the browser checks for each new server.
Unless a keystore is provided (and you define the property proxy.cert.alias),
JMeter needs to use the keytool application to create the keystore entries.
JMeter includes code to check that keytool is available by looking in various standard places.
If JMeter is unable to find the keytool application, it will report an error.
If necessary, the system property keytool.directory can be used to tell JMeter where to find keytool.
This should be defined in the file system.properties.
The JMeter certificates are generated (if necessary) when the Start button is pressed.
The cursor is changed to an hour-glass whilst this is happening. When certificate generation is complete, the GUI will display a pop-up dialogue containing the details of the certificate for the root CA. This certificate needs to be installed by the browser in order for it to accept the host certificates generated by JMeter; see below for details.
If necessary, you can force JMeter to regenerate the keystore (and the exported certificates - ApacheJMeterTemporaryRootCA[.usr|.crt]) by deleting the keystore file proxyserver.jks from the JMeter directory.
This certificate is not one of the certificates that browsers normally trust, and will not be for the correct host.
As a consequence:
- The browser should display a dialogue asking if you want to accept the certificate or not. For example:
1) The server's name "`www.example.com`" does not match the certificate's name "`_ JMeter Root CA for recording (INSTALL ONLY IF IT IS YOURS)`". Somebody may be trying to eavesdrop on you. 2) The certificate for "`_ JMeter Root CA for recording (INSTALL ONLY IF IT IS YOURS)`" is signed by the unknown Certificate Authority "`_ JMeter Root CA for recording (INSTALL ONLY IF IT IS YOURS)`". It is not possible to verify that this is a valid certificate.You will need to accept the certificate in order to allow the JMeter Proxy to intercept the SSL traffic in order to record it. However, do not accept this certificate permanently; it should only be accepted temporarily. Browsers only prompt this dialogue for the certificate of the main URL, not for the resources loaded in the page, such as images, CSS or JavaScript files hosted on a secured external CDN. If you have such resources (gmail has for example), you’ll have to first browse manually to these other domains in order to accept JMeter’s certificate for them. Check injmeter.logfor secure domains that you need to register certificate for. - If the browser has already registered a validated certificate for this domain, the browser will detect JMeter as a security breach and will refuse to load the page. If so, you have to remove the trusted certificate from your browser’s keystore.
Versions of JMeter from 2.10 onwards still support this method, and will continue to do so if you define the following property:
proxy.cert.alias
The following properties can be used to change the certificate that is used:
proxy.cert.directory- the directory in which to find the certificate (default = JMeterbin/)proxy.cert.file- name of the keystore file (default “proxyserver.jks”)proxy.cert.keystorepass- keystore password (default “password”) [Ignored if using JMeter certificate]proxy.cert.keypassword- certificate key password (default “password”) [Ignored if using JMeter certificate]proxy.cert.type- the certificate type (default “JKS”) [Ignored if using JMeter certificate]proxy.cert.factory- the factory (default “SunX509”) [Ignored if using JMeter certificate]proxy.cert.alias- the alias for the key to be used. If this is defined, JMeter does not attempt to generate its own certificate(s).proxy.ssl.protocol- the protocol to be used (default “SSLv3”)
Installing the JMeter CA certificate for HTTPS recording
Section titled “Installing the JMeter CA certificate for HTTPS recording”As mentioned above, when run under Java 8, JMeter can generate certificates for each server.
For this to work smoothly, the root CA signing certificate used by JMeter needs to be trusted by the browser.
The first time that the recorder is started, it will generate the certificates if necessary.
The root CA certificate is exported into a file with the name ApacheJMeterTemporaryRootCA in the current launch directory.
When the certificates have been set up, JMeter will show a dialog with the current certificate details.
At this point, the certificate can be imported into the browser, as per the instructions below.
Note that once the root CA certificate has been installed as a trusted CA, the browser will trust any certificates signed by it. Until such time as the certificate expires or the certificate is removed from the browser, it will not warn the user that the certificate is being relied upon. So anyone that can get hold of the keystore and password can use the certificate to generate certificates which will be accepted by any browsers that trust the JMeter root CA certificate. For this reason, the password for the keystore and private keys are randomly generated and a short validity period used. The passwords are stored in the local preferences area. Please ensure that only trusted users have access to the host with the keystore.
Installing the certificate in Firefox
Section titled “Installing the certificate in Firefox”Choose the following options:
Tools / OptionsAdvanced / CertificatesView CertificatesAuthoritiesImport …- Browse to the JMeter launch directory, and click on the file
ApacheJMeterTemporaryRootCA.crt, pressOpen - Click
Viewand check that the certificate details agree with the ones displayed by the JMeter Test Script Recorder - If OK, select “
Trust this CA to identify web sites”, and pressOK - Close dialogs by pressing
OKas necessary
Installing the certificate in Chrome or Internet Explorer
Section titled “Installing the certificate in Chrome or Internet Explorer”Both Chrome and Internet Explorer use the same trust store for certificates.
- Browse to the JMeter launch directory, and click on the file
ApacheJMeterTemporaryRootCA.crt, and open it - Click on the “
Details” tab and check that the certificate details agree with the ones displayed by the JMeter Test Script Recorder - If OK, go back to the “
General” tab, and click on “Install Certificate …” and follow the Wizard prompts
Installing the certificate in Opera
Section titled “Installing the certificate in Opera”Tools / Preferences / Advanced / SecurityManage Certificates …- Select “
Intermediate” tab, click “Import …” - Browse to the JMeter launch directory, and click on the file
ApacheJMeterTemporaryRootCA.usr, and open it
| Name | Required | Description |
|---|---|---|
| Name | No | Descriptive name for this element that is shown in the tree. |
| Port | Yes | The port that the HTTP(S) Test Script Recorder listens to. 8888 is the default, but you can change it. |
| HTTPS Domains | No | List of domain (or host) names for HTTPS. Use this to pre-generate certificates for all servers you wish to record. For example, *.example.com,*.subdomain.example.com Note that wildcard domains only apply to one level, i.e. abc.subdomain.example.com matches *.subdomain.example.com but not *.example.com |
| Target Controller | Yes | The controller where the proxy will store the generated samples. By default, it will look for a Recording Controller and store them there wherever it is. |
| Grouping | Yes | Whether to group samplers for requests from a single “click” (requests received without significant time separation), and how to represent that grouping in the recording: - Do not group samplers - store all recorded samplers sequentially, without any grouping. - Add separators between groups - add a controller named “--------------” to create a visual separation between the groups. Otherwise the samplers are all stored sequentially. - Put each group in a new controller - create a new Simple Controller for each group, and store all samplers for that group in it. - Store 1st sampler of each group only - only the first request in each group will be recorded. The “Follow Redirects” and “Retrieve All Embedded Resources …” flags will be turned on in those samplers. - Put each group in a new transaction controller - create a new Transaction Controller for each group, and store all samplers for that group in it. The property proxy.pause determines the minimum gap that JMeter needs between requests to treat them as separate “clicks”. The default is 5000 (milliseconds) i.e. 5 seconds. If you are using grouping, please ensure that you leave the required gap between clicks. |
| Capture HTTP Headers | Yes | Should headers be added to the plan? If specified, a Header Manager will be added to each HTTP Sampler. The Proxy server always removes Cookie and Authorization headers from the generated Header Managers. By default it also removes If-Modified-Since and If-None-Match headers. These are used to determine if the browser cache items are up to date; when recording one normally wants to download all the content. To change which additional headers are removed, define the JMeter property proxy.headers.remove as a comma-separated list of headers. |
| Add Assertions | Yes | Add a blank assertion to each sampler? |
| Regex Matching | Yes | Use Regex Matching when replacing variables? If checked replacement will use word boundaries, i.e. it will only replace word matching values of variable, not part of a word. A word boundary follows Perl5 definition and is equivalent to \b. More information below in the paragraph about “User Defined Variable replacement”. |
| Prefix/Transaction name | No | Add a prefix to sampler name during recording (Prefix mode). Or replace sampler name by user chosen name (Transaction name) |
| Naming scheme | No | Select the naming scheme for sampler names during recording. Default is Transaction name |
| Naming format | No | If Use format string is selected as naming scheme, a freestyle format can be given. Placeholders for the transaction name, scheme, host, port, path and counter can be given by #{name}, #{scheme}, #{host}, #{port}, #{path}, #{url} and #{counter}. A simple format could be “#{name}-#{counter}”, which would be equivalent to the numbered default naming scheme. For more complex formatting Java formatting for MessageFormat can be used, as in “#{counter,number,000}: #{name}-#{path}”, which would print the counter filled with up to three zeroes. Note that scheme is called protocol in the sampler GUI and host is called domain. Default is an empty string. |
| Counter start value | No | Can be used to reset the counter to a given value. Note, that the next sample will first increment and then use the value. If the first sampler should start with 1, reset the counter to 0. |
| Create new transaction after request (ms) | No | Inactivity time between two requests needed to consider them in two separate groups. |
| Type | Yes | Which type of sampler to generate (the HTTPClient default or Java) |
| Redirect Automatically | Yes | Set Redirect Automatically in the generated samplers? |
| Follow Redirects | Yes | Set Follow Redirects in the generated samplers? :::note Note: see “Recording and redirects” section below for important information. ::: |
| Use Keep-Alive | Yes | Set Use Keep-Alive in the generated samplers? |
| Retrieve all Embedded Resources | Yes | Set Retrieve all Embedded Resources in the generated samplers? |
| Content Type filter | No | Filter the requests based on the content-type - e.g. “text/html [;charset=utf-8 ]”. The fields are regular expressions which are checked to see if they are contained in the content-type. [Does not have to match the entire field]. The include filter is checked first, then the exclude filter. Samples which are filtered out will not be stored. :::note Note: this filtering is applied to the content type of the response ::: |
| Patterns to Include | No | Regular expressions that are matched against the full URL that is sampled. Allows filtering of requests that are recorded. All requests pass through, but only those that meet the requirements of the Include/Exclude fields are recorded. If both Include and Exclude are left empty, then everything is recorded (which can result in dozens of samples recorded for each page, as images, stylesheets, etc. are recorded). :::note If there is at least one entry in the Include field, then only requests that match one or more Include patterns are recorded ::: . |
| Patterns to Exclude | No | Regular expressions that are matched against the URL that is sampled. :::note Any requests that match one or more Exclude pattern are not recorded ::: . |
| Notify Child Listeners of filtered samplers | No | Notify Child Listeners of filtered samplers :::note Any response that match one or more Exclude pattern is not delivered to Child Listeners (View Results Tree) ::: . |
| Start Button | N/A | Start the proxy server. JMeter writes the following message to the console once the proxy server has started up and is ready to take requests: “Proxy up and running!”. |
| Stop Button | N/A | Stop the proxy server. |
| Restart Button | N/A | Stops and restarts the proxy server. This is useful when you change/add/delete an include/exclude filter expression. |
Recording and redirects
Section titled “Recording and redirects”During recording, the browser will follow a redirect response and generate an additional request.
The Proxy will record both the original request and the redirected request
(subject to whatever exclusions are configured).
The generated samples have “Follow Redirects” selected by default, because that is generally better.
Now if JMeter is set to follow the redirect during replay, it will issue the original request,
and then replay the redirect request that was recorded.
To avoid this duplicate replay, JMeter tries to detect when a sample is the result of a previous
redirect. If the current response is a redirect, JMeter will save the redirect URL.
When the next request is received, it is compared with the saved redirect URL and if there is a match,
JMeter will disable the generated sample. It also adds comments to the redirect chain.
This assumes that all the requests in a redirect chain will follow each other without any intervening requests.
To disable the redirect detection, set the property proxy.redirect.disabling=false
Includes and Excludes
Section titled “Includes and Excludes”The include and exclude patterns are treated as regular expressions (using Jakarta ORO). They will be matched against the host name, port (actual or implied), path and query (if any) of each browser request. If the URL you are browsing is
“http://localhost/jmeter/index.html?username=xxxx”,
then the regular expression will be tested against the string:
“localhost:80/jmeter/index.html?username=xxxx”.
Thus, if you want to include all .html files, your regular expression might look like:
“.*\.html(\?.*)?” - or “.*\.html
if you know that there is no query string or you only want html pages without query strings.
If there are any include patterns, then the URL must match at least one of the patterns , otherwise it will not be recorded. If there are any exclude patterns, then the URL must not match any of the patterns , otherwise it will not be recorded. Using a combination of includes and excludes, you should be able to record what you are interested in and skip what you are not.
Capturing binary POST data
Section titled “Capturing binary POST data”JMeter is able to capture binary POST data.
To configure which content-types are treated as binary, update the JMeter property proxy.binary.types.
The default settings are as follows:
# These content-types will be handled by saving the request in a file:proxy.binary.types=application/x-amf,application/x-java-serialized-object# The files will be saved in this directory:proxy.binary.directory=user.dir# The files will be created with this file filesuffix:proxy.binary.filesuffix=.binaryAdding timers
Section titled “Adding timers”It is also possible to have the proxy add timers to the recorded script. To
do this, create a timer directly within the HTTP(S) Test Script Recorder component.
The proxy will place a copy of this timer into each sample it records, or into
the first sample of each group if you’re using grouping. This copy will then be
scanned for occurrences of variable \${T} in its properties, and any such
occurrences will be replaced by the time gap from the previous sampler
recorded (in milliseconds).
When you are ready to begin, hit “start”.
Where Do Samples Get Recorded?
Section titled “Where Do Samples Get Recorded?”JMeter places the recorded samples in the Target Controller you choose. If you choose the default option
“Use Recording Controller”, they will be stored in the first Recording Controller found in the test object tree (so be
sure to add a Recording Controller before you start recording).
If the Proxy does not seem to record any samples, this could be because the browser is not actually using the proxy.
To check if this is the case, try stopping the proxy.
If the browser still downloads pages, then it was not sending requests via the proxy.
Double-check the browser options.
If you are trying to record from a server running on the same host,
then check that the browser is not set to “Bypass proxy server for local addresses”
(this example is from IE7, but there will be similar options for other browsers).
If JMeter does not record browser URLs such as http://localhost/ or http://127.0.0.1/,
try using the non-loopback hostname or IP address, e.g. http://myhost/ or http://192.168.0.2/.
Handling of HTTP Request Defaults
Section titled “Handling of HTTP Request Defaults”If the HTTP(S) Test Script Recorder finds enabled HTTP Request Defaults directly within the controller where samples are being stored, or directly within any of its parent controllers, the recorded samples will have empty fields for the default values you specified. You may further control this behaviour by placing an HTTP Request Defaults element directly within the HTTP(S) Test Script Recorder, whose non-blank values will override those in the other HTTP Request Defaults. See Best Practices with the HTTP(S) Test Script Recorder for more info.
User Defined Variable replacement
Section titled “User Defined Variable replacement”Similarly, if the HTTP(S) Test Script Recorder finds User Defined Variables (UDV) directly within the controller where samples are being stored, or directly within any of its parent controllers, the recorded samples will have any occurrences of the values of those variables replaced by the corresponding variable. Again, you can place User Defined Variables directly within the HTTP(S) Test Script Recorder to override the values to be replaced. See Best Practices with the Test Script Recorder for more info.
Replacement by Variables: by default, the Proxy server looks for all occurrences of UDV values.
If you define the variable WEB with the value www, for example,
the string www will be replaced by \${WEB} wherever it is found.
To avoid this happening everywhere, set the “Regex Matching” check-box.
This tells the proxy server to treat values as Regexes (using the perl5 compatible regex matchers provided by ORO).
If “Regex Matching” is selected every variable will be compiled into a perl compatible regex enclosed in
\b( and )\b. That way each match will start and end at a word boundary.
If you don’t want your regex to be enclosed with those boundary matchers, you have to enclose your
regex within parens, e.g ('.*?') to match 'name' out of You can call me 'name'.
If you want to match a whole string only, enclose it in (^ and $), e.g. (^thus$).
The parens are necessary, since the normally added boundary characters will prevent ^ and
$ to match.
If you want to match /images at the start of a string only, use the value (^/images).
Jakarta ORO also supports zero-width look-ahead, so one can match /images/…
but retain the trailing / in the output by using (^/images(?=/)).
Look out for overlapping matchers. For example the value .* as a regex in a variable named
regex will partly match a previous replaced variable, which will result in something like
\${{regex}, which is most probably not the desired result.
If there are any problems interpreting any variables as patterns, these are reported in jmeter.log,
so be sure to check this if UDVs are not working as expected.
When you are done recording your test samples, stop the proxy server (hit the “stop” button). Remember to reset
your browser’s proxy settings. Now, you may want to sort and re-order the test script, add timers, listeners, a
cookie manager, etc.
How can I record the server’s responses too?
Section titled “How can I record the server’s responses too?”Just place a View Results Tree listener as a child of the HTTP(S) Test Script Recorder and the responses will be displayed. You can also add a Save Responses to a file Post-Processor which will save the responses to files.
Associating requests with responses
Section titled “Associating requests with responses”If you define the property proxy.number.requests=true
JMeter will add a number to each sampler and each response.
Note that there may be more responses than samplers if excludes or includes have been used.
Responses that have been excluded will have labels enclosed in [ and ], for example [23 /favicon.ico]
Cookie Manager
Section titled “Cookie Manager”If the server you are testing against uses cookies, remember to add an HTTP Cookie Manager to the test plan when you have finished recording it. During recording, the browser handles any cookies, but JMeter needs a Cookie Manager to do the cookie handling during a test run. The JMeter Proxy server passes on all cookies sent by the browser during recording, but does not save them to the test plan because they are likely to change between runs.
Authorization Manager
Section titled “Authorization Manager”The HTTP(S) Test Script Recorder grabs “Authentication” header, tries to compute the Auth Policy. If Authorization Manager was added to target
controller manually, HTTP(S) Test Script Recorder will find it and add authorization (matching ones will be removed). Otherwise
Authorization Manager will be added to target controller with authorization object.
You may have to fix automatically computed values after recording.
Uploading files
Section titled “Uploading files”Some browsers (e.g. Firefox and Opera) don’t include the full name of a file when uploading files. This can cause the JMeter proxy server to fail. One solution is to ensure that any files to be uploaded are in the JMeter working directory, either by copying the files there or by starting JMeter in the directory containing the files.
Recording HTTP Based Non Textual Protocols not natively available in JMeter
Section titled “Recording HTTP Based Non Textual Protocols not natively available in JMeter”You may have to record an HTTP protocol that is not handled by default by JMeter (Custom Binary Protocol, Adobe Flex, Microsoft Silverlight, … ).
Although JMeter does not provide a native proxy implementation to record these protocols, you have the ability to
record these protocols by implementing a custom SamplerCreator. This Sampler Creator will translate the binary format into a HTTPSamplerBase subclass
that can be added to the JMeter Test Case.
For more details see “Extending JMeter”.